
Creating new data source#
Only create data sources using the Customer Portal for which you are the provider.
If the data has multiple owners, we recommend the data provider create one data source for each. This will make the approval process for access to the data source easier for you to manage, as it is up to each data owner to decide if they want to share data with specific services. Data owner approval must be obtained outside of the Customer Portal, for example through email. Such approval flows will be supported at a later stage of the Customer Portal development.
You can register a new data source under the “Data source” tab in the Feide Customer Portal. Click on “Create data source”.
When registering a new data source, the required steps are shown in the top bar. You need to fill out the required fields marked with * to complete creation. The information you enter will be saved for later if you can’t finish everything at once. Remember that the optional fields could be useful for the consumers of your data source.
Information about the data source#
In “About the data source” you need to register information about the data source.
This information will be made available to other users of the Customer Portal and later on feide.no and in Feide’s APIs if you choose to publish the data source in the last step. Use this information to describe your data source to other consumers.
We recommend that you write the name of the data source and description in multiple languages to make your your data source easier to find.
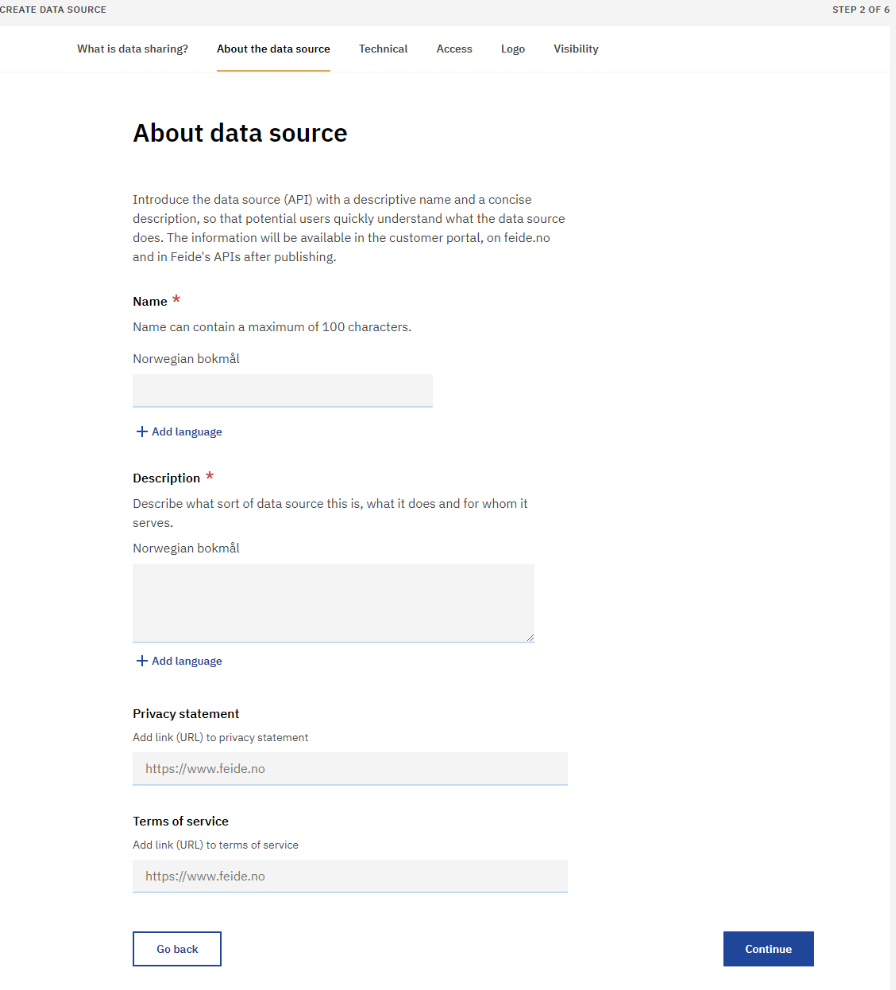
Privacy statement
A privacy statement intended to help organizations locate the privacy policy for the data source. You can enter a URL to a website containing the privacy statement of your data source. This link will be displayed when viewing the data source in the Customer Portal.
Terms of service
You can enter a URL to your terms of service if your data source has one. The link to the Terms of service will be displayed when viewing the data source in the Customer Portal.
Technical#
Under the Technical tab you need to register a URL to a website containing technical documentation about how to use your data source.
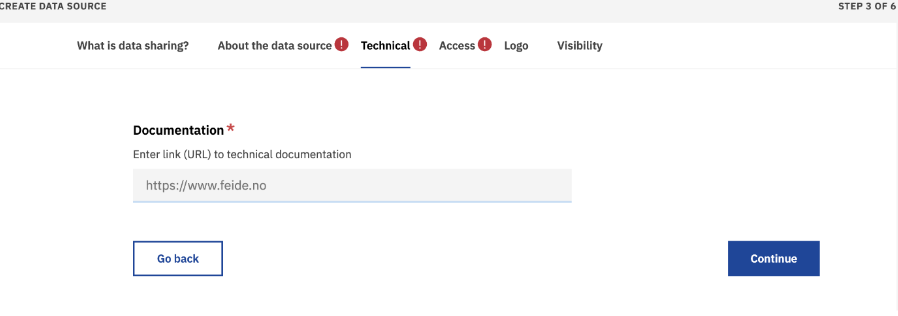
This URL is made available to service providers when viewing your data source (if it is made public). This will make it easier for service providers to make use of your data source.
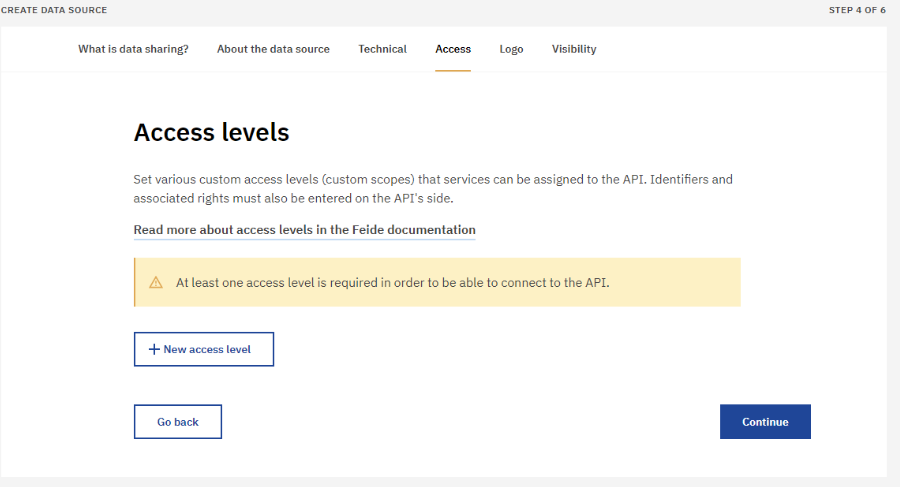
Access levels#
Under the Access tab you define access levels for your data source.
A data source can have multiple access levels. This is useful if the data source contains different types of information. It is required for a data source to have at least one access level.
We recommend adding an access level for the different types of information in the data source. This will make it easier for the service to understand what information about the end user they receive. For example, if the data source has information about subjects and grades for the student, the subjects and grades should be two different access levels so services that only need subjects only get the subjects and not the grades.
Creating a new Access level#
Click on “New access level” to create a new access level.
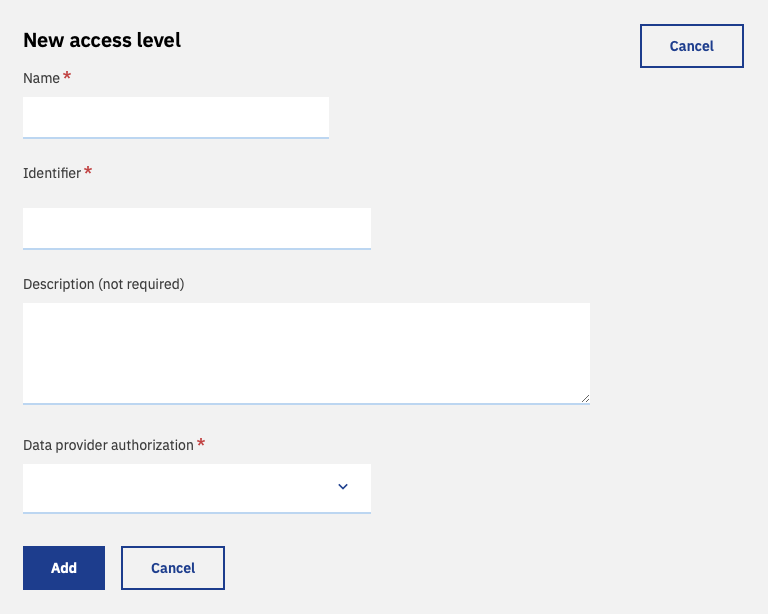
When creating an access level, both a name and an identifier are needed. We recommend that the identifier and name reflect what kind of access the access level provides. The identifier needs to be unique for the data source and cannot contain spaces. The identifier is what will become the actual scope used by clients of the data source.
The description is not required but recommended to give a description to the service about what type of information the access level provides. This will help the service provider decide if they are requesting the right access level to get the data they need.
The access level can use different authorization modes. There are two modes: Free access and Requires approval. You can select the mode in the data provider authorization drop-down menu.
If there is no need for the data owner to approve which services should be able to access data from the access level, set the authorization mode to Free access. If you choose Free access, requests from services for access to this access level will get automatically approved. Be mindful of what data you provide with free access, so you avoid sensitive or personal data being shared without the data owner assessing whether it is safe and necessary for the service to receive that data.
If you choose Requires approval, services must ask for access to the given level, and you can approve or deny their request. This is done under the Access control tab on the data source. See Managing access to a data source
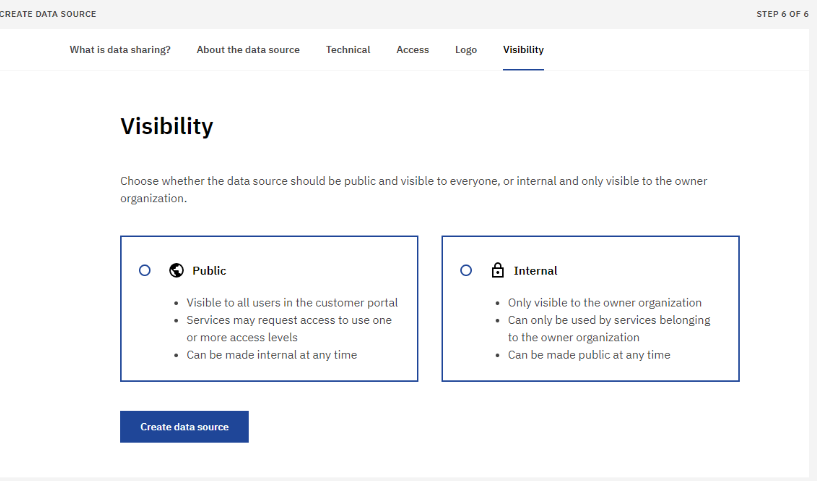
If you don’t want any requests from service provider to use the data source, you can mark the data source as internal, so it will not be shown in the list of available data sources. This is done in the Visibility tab when all the required information is entered.
When you are finished adding all the access levels in the data source either go to the next tab or click on Continue.
Changing access level#
You can at any time edit data provider authorization (authorization mode) of the access level.

This is done under the Edit tab on the data source. In the list of access level click on “…”/more on the right side and select “Edit”.
If services have requested access to the access level with free access before this change, the service will still have access to the data. You can revoke access if these service should not have access to the data for the access level.
Logo#
Under the Logo tab, you can upload a logo of the data source to make the data source more recognizable.
The logo is displayed in the list of data sources in the Customer Portal.
The logo must be in png, jpeg, or gif format, and should be at least 200x200 pixels. If the logo does not look good when reduced to 48x48 pixels, is it possible to add a smaller logo file as well.
Creating and publishing the data source#
To create the data source, you need to register all the required information.
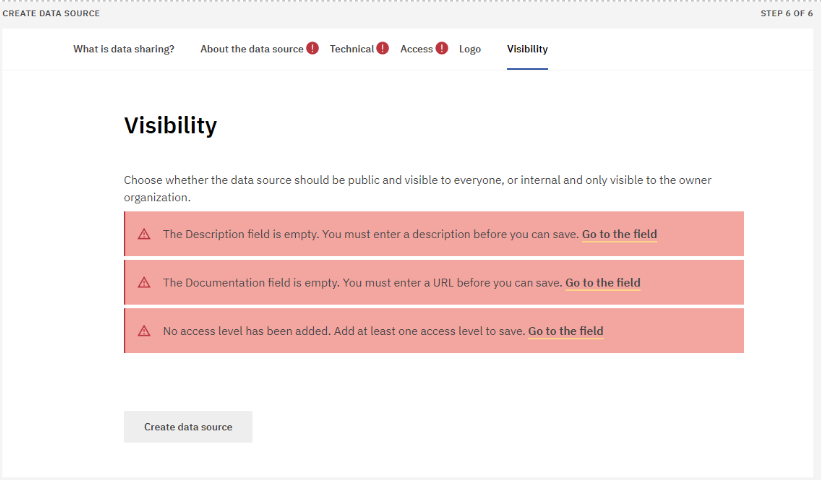
If there is information that is required but is not registered, you wil get an error message on the Visibility tab when creating the data source. What information is missing is described in the error message. You can go to the corresponding tab either by clicking on “Go to the field” on the error message or going to the tab in the top bar with an error icon shown.
If you don’t have all the required information available, the information already entered is saved, enabling you to fill in the rest of the information later.
When all required fields are registered, you can create the data source.
In order for your data source (API) to be listed publicly for other service providers to use, it needs to select Public in the Visibility tab on the data source.
When the data source is made public, services that want to connect to the data source may request access to use one or more access levels. If you don’t want services outside of the owner organization to connect to the data source, make the it internal.
A public data source may be made internal at any time after creation by editing the data source.